logo
  • info@tektins.com
  • +234-812-437-0280
  • info@tektins.com
  • +234-812-437-0280
logo
  • Home
  • About
  • Our Solutions
    • Smart Security
      • CCTV Camera
      • Automatic Gate
      • Access Control Systems
      • Vehicle Tracking & Security
      • Sliding Motion Sensor Door
      • Boom Barrier System
      • Fire Alarm System
      • Hotel Door Lock System
      • Turnstile Barrier System
    • Solar Energy Solution
      • Solar Inverters Sales & Installation
      • Solar Panel Installation
      • Solar Street Light Installation
      • Solar Water Heater Installation
    • Smart Home Automation
    • Smart Business Solutions
      • Cybersecurity
  • Shop
    • Power Products
      • Inverters
      • Solar Products
      • UPS & Surge Protectors
      • Generators
      • Batteries
    • Security & Safety
      • Access Control Products
      • Biometric & Access Control Products
      • Gate Barriers
  • Blog
    • News & Trends
    • Reviews & Buying Guide
    • Tutorial/ How to
    • Tech Events
    • Hardware
    • Software & Apps
  • Contact
Get A Quote
Shape
Shape
Shape

Step-by-Step Process of Installing Solar Power Systems.

  • Home
  • Tutorial/ How to
  • Step-by-Step Process of Installing Solar Power Systems.
  • By Rita N
  • January 5, 2026
  • Tutorial/ How to

While many homeowners hire professionals, understanding how to install solar power system components helps you oversee the project or even tackle a DIY installation safely.

Phase 1: Planning and Permitting

Before any hardware touches your roof, you must handle the logistics.

  • Energy Audit: Review your past 12 months of electricity bills to determine the system size you need.

  • Site Assessment: Ensure your roof is structurally sound and receives adequate sunlight (ideally south-facing in the Northern Hemisphere) without shading from trees or chimneys.

  • Permits and Paperwork: You will need building and electrical permits from your local municipality. You must also apply for Interconnection with your utility company to feed excess power back to the grid.

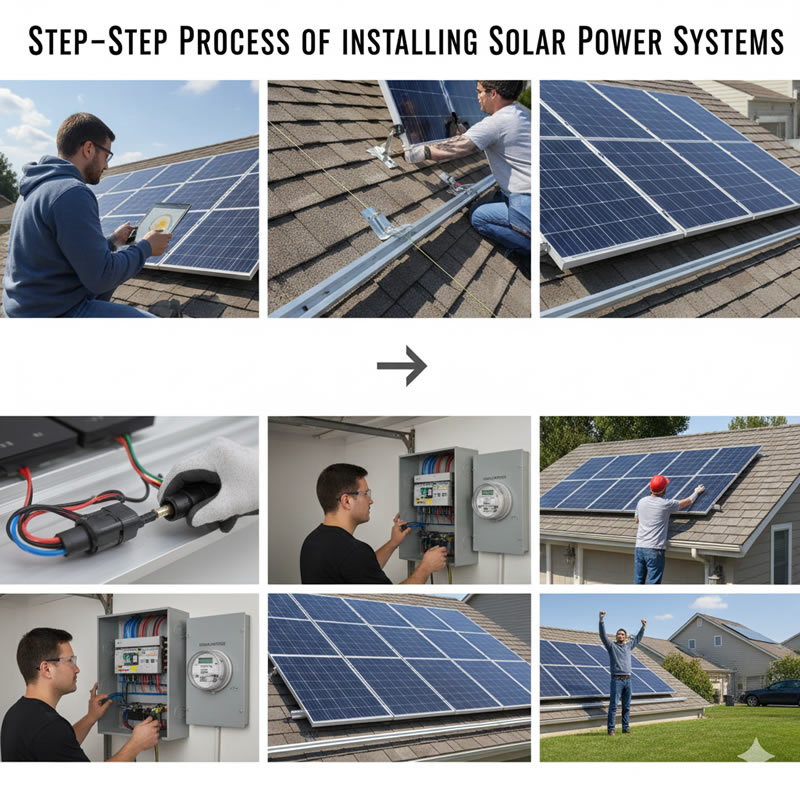
Phase 2: Hardware Installation

Once you have your permits and equipment, the physical installation follows a specific sequence.

1. Mounting the Racking System

The racking is the skeleton that holds your panels.

  • Install flashing and roof mounts into the rafters to ensure a leak-proof seal.

  • Attach the aluminum rails to these mounts.

  • Critical Check: Use a level to ensure the rails are perfectly aligned; even a slight tilt can make the final panel array look crooked.

2. Installing the Solar Panels

With the racking secure, the panels (modules) are lifted onto the roof.

  • Placement: Secure the panels to the rails using mid-clamps and end-clamps.

  • Wiring: Connect the panels in “strings” using MC4 connectors. Most modern systems use Microinverters (one under each panel) or a String Inverter (one central unit).

3. Electrical Wiring and Component Connection

This is the most technical part of how to install solar power system hardware.

  • The Inverter: Install the inverter near your main electrical panel. This device converts Direct Current (DC) from the panels into Alternating Current (AC) for your home.

  • Disconnect Switches: Install AC and DC disconnects so the system can be manually turned off for maintenance or in emergencies.

  • The Battery (Optional): If you are going off-grid or want backup power, connect your solar charge controller to a battery bank.

Phase 3: Inspection and Commissioning

You cannot flip the switch as soon as the last wire is connected.

  • City Inspection: A local inspector will visit to ensure the wiring meets the National Electrical Code (NEC).

  • Utility PTO: After the city signs off, your utility company will grant Permission to Operate (PTO). They may install a “net meter” to track the energy you send back to the grid.

  • System Startup: Turn on the breakers, and your system will begin generating power.

Warning: Solar panels generate electricity the moment they are exposed to light. Always treat wires as “live” and wear insulated gloves and fall-protection gear when working on a roof.

Share:

Comments are closed

Recent Post
  • ChatGPT Image Jan 6 2026 04_40_11 PM 85x85
    January 6, 2026
    Solar Power Installation in Lagos: Challenges and
  • Gemini_Generated_Image_m1eypdm1eypdm1ey 85x85
    January 6, 2026
    Cost of Solar Power Installation in Lagos:
  • Gemini_Generated_Image_1i8mmn1i8mmn1i8m 85x85
    January 6, 2026
    Benefits of Solar Power Installation for Homes
Search
Category
  • Hardware (08)
  • Insight (13)
  • News & Trends (08)
  • Reviews & Buying Guide (08)
  • Software & Apps (01)
Popular Tags

CCTV CCTV Camera inverters IT Consultancy laptop smart home

Buy Bluetooth Speakers
Wireless speakers for sale in Lagos
buy laptops in lagos nigeria
furniture cleaning company lagos
Latest Mobile Phone Prices
mobile phones for sale
quote shape
quote shape2
GET IN TOUCH

We Take Care of Your
Technology

get A Quote
shape
shape
shape
shape
shodow
tektins logo

At Tektins we specialize in providing smart technology solutions that help you stay ahead of the curve in businesses & everyday living. We supply, install and maintain technology solutions

Our Solutions

  • Smart Security
  • Solar Inverter
  • Home Automation
  • Smart Business

Quick Link

  • About TekTins
  • Our Solutions
  • Shop
  • Blog
  • Contact Us

Contact Us

9 Fadeyi Street, Off Obafemi Awolowo Way, Ikeja Lagos

  • Opening Hours:

    Mon - Sat: 9.00 AM - 5.00 PM

  • Phone Call:

    08124370280

© Copyright 2025. All Rights Reserved. Designed by ELOQUENT

    • Terms & Condition
    • Privacy Policy